Metal, clay, paint, textiles...
Drawn and painted studio art portfolio from university courses is limited at this time due to unforeseen damage to physical portfolio. Images provided here are all that remains.
Skills include painting with acrylics and watercolors; hand building, wheel throwing, and mold making ceramics; metal-working; drawing; printmaking; knitting and tattooing.
For a more comprehensive jewelry and tattoo portfolio visit joyzdzigns.myportfolio.com
For a more comprehensive jewelry and tattoo portfolio visit joyzdzigns.myportfolio.com
All images are taken by Joy Carlsen the artist unless otherwise stated
Organic seed pod pendant and box with stand
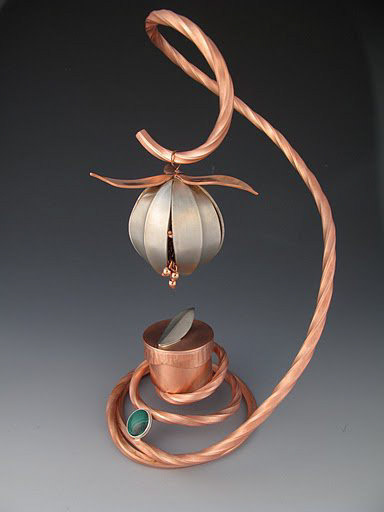
I created this piece as my final project for a jewelry and metalsmithing class. Processes that were required to be included were soldering, stamping, creating a lidded object and stone setting. I decided to take the project a step further – I have a fondness for organic shapes, I love flowers and all kinds of vegetation so I decided to create the seed pod pendant. I also wanted include two separate metals, I selected the silver and copper because I liked the contrast of the warm and cool colors as opposed to using a warm yellow brass with the copper. I enjoyed the contrast of the metals and the organic shapes and curves so much that I added the silver leaf on the lid to match.
I wanted the two pieces to come together as a sculptural object and to add some more motion in the piece, I enjoyed the dangling beads in the center - so I created a twisted swirling stand to hold it all together. This piece was created using both soft and hard soldering techniques, hand sawing, filing, annealing, forging/hammering with mallets and stamps, sinking with hammers and rubber mallets; bending and twisting wire using a vice grip, pliers and ring mandrel; sanding and polishing, making a bezel setting for a cabochon stone, and stone setting.
I wanted the two pieces to come together as a sculptural object and to add some more motion in the piece, I enjoyed the dangling beads in the center - so I created a twisted swirling stand to hold it all together. This piece was created using both soft and hard soldering techniques, hand sawing, filing, annealing, forging/hammering with mallets and stamps, sinking with hammers and rubber mallets; bending and twisting wire using a vice grip, pliers and ring mandrel; sanding and polishing, making a bezel setting for a cabochon stone, and stone setting.
Photo courtesy of the Metropolitan State University of Denver Art Department
Photographic Salted Paper Prints using 4"x5" negatives

first round of attempts with 2 kinds of paper
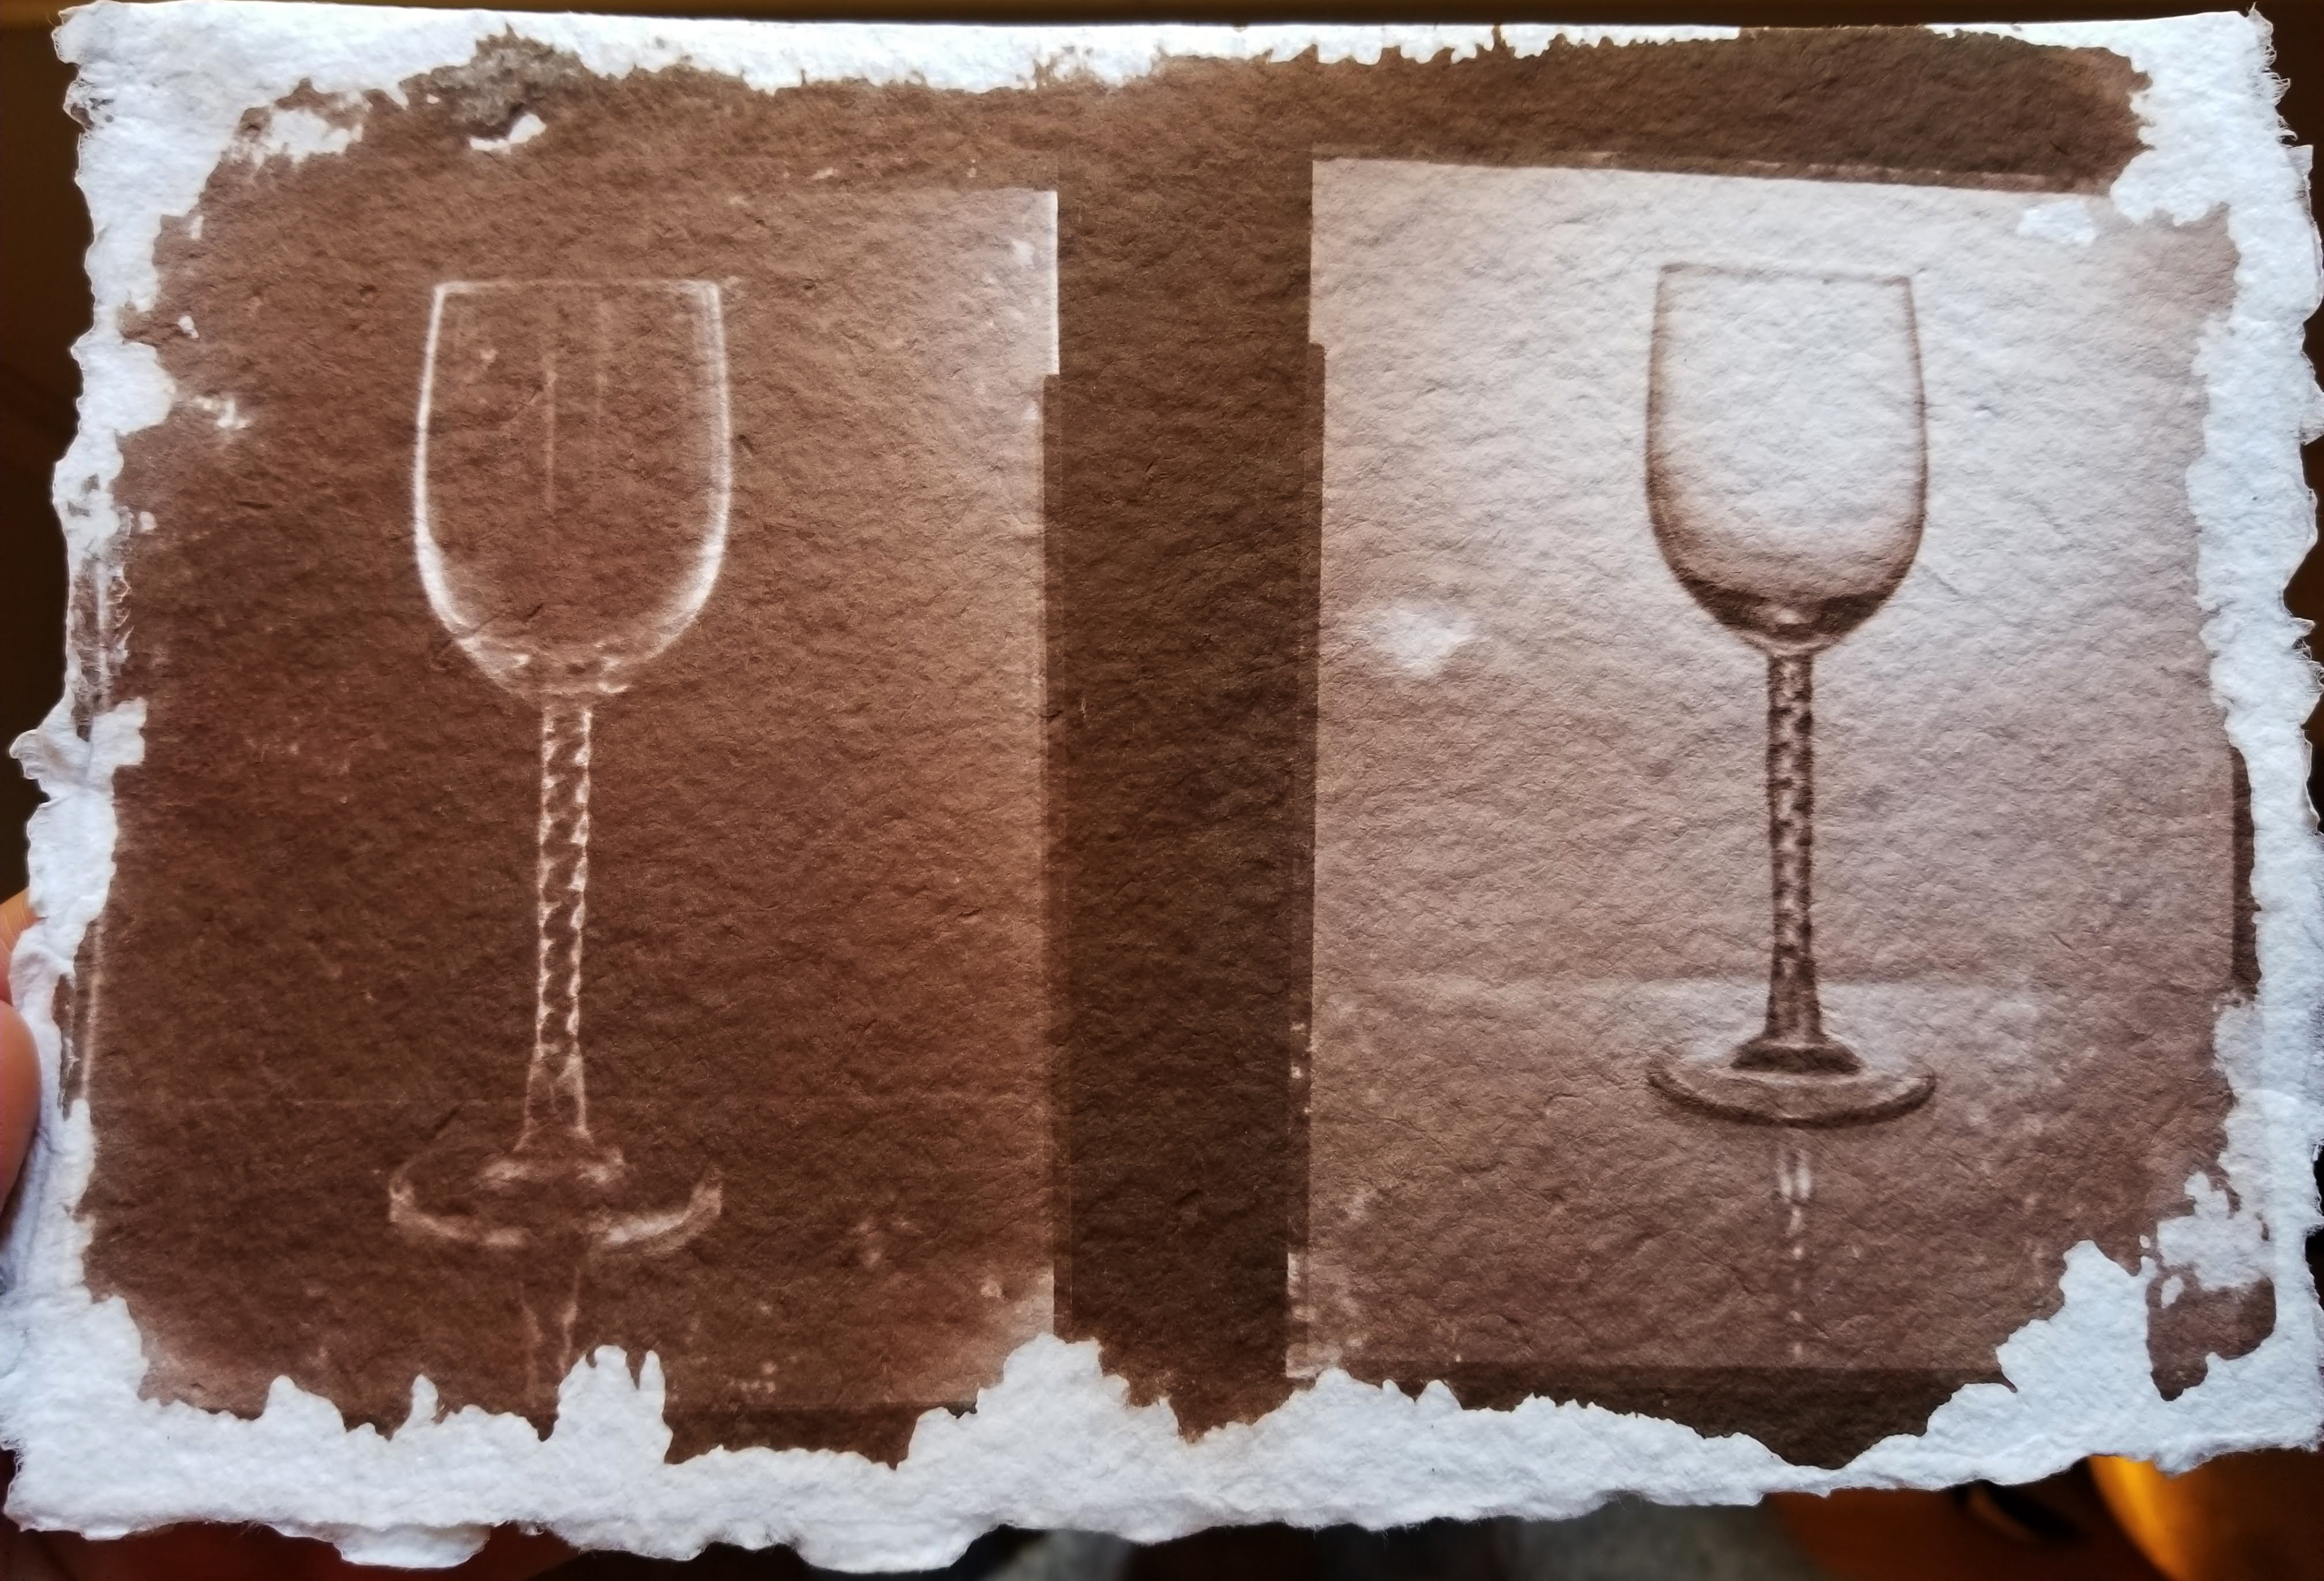
finally achieved a quality image
Materials: distilled water, table salt, acid free fine-art paper, silver nitrate, sodium-thiosulfate, a printable large-format negative, and a picture frame. Salt print made using 4x5 negatives and thick rag watercolor paper. I used some old 4x5 negatives that I had taken during my photography degree classes and thick rag watercolor paper. I did attempt to use paper with gelatin sizing coating one side however all attempts with the coated paper failed.
The process begins with coating the paper in a salt water solution. After drying, in a dark room the paper is then coated in a silver nitrate solution which reacts with the salt forming silver chloride, which in turn forms a silver atom which reacts to light. The paper was dried in the dark room, then placed in a frame behind glass with the 4x5 negative pressed against the surface. The paper was then taken outside in the sun to be exposed. After several minutes, the paper was removed from the frame, and washed in a water bath and placed into a sodium thiosulfate solution to halt the light sensitivity of the silver halide. It was then washed again and dried.
Demonstrates ability to follow directions, undergo personal research, have patience, learn from failures, and my willingness to reconfigure a process or do more research in order to produce the desired result.
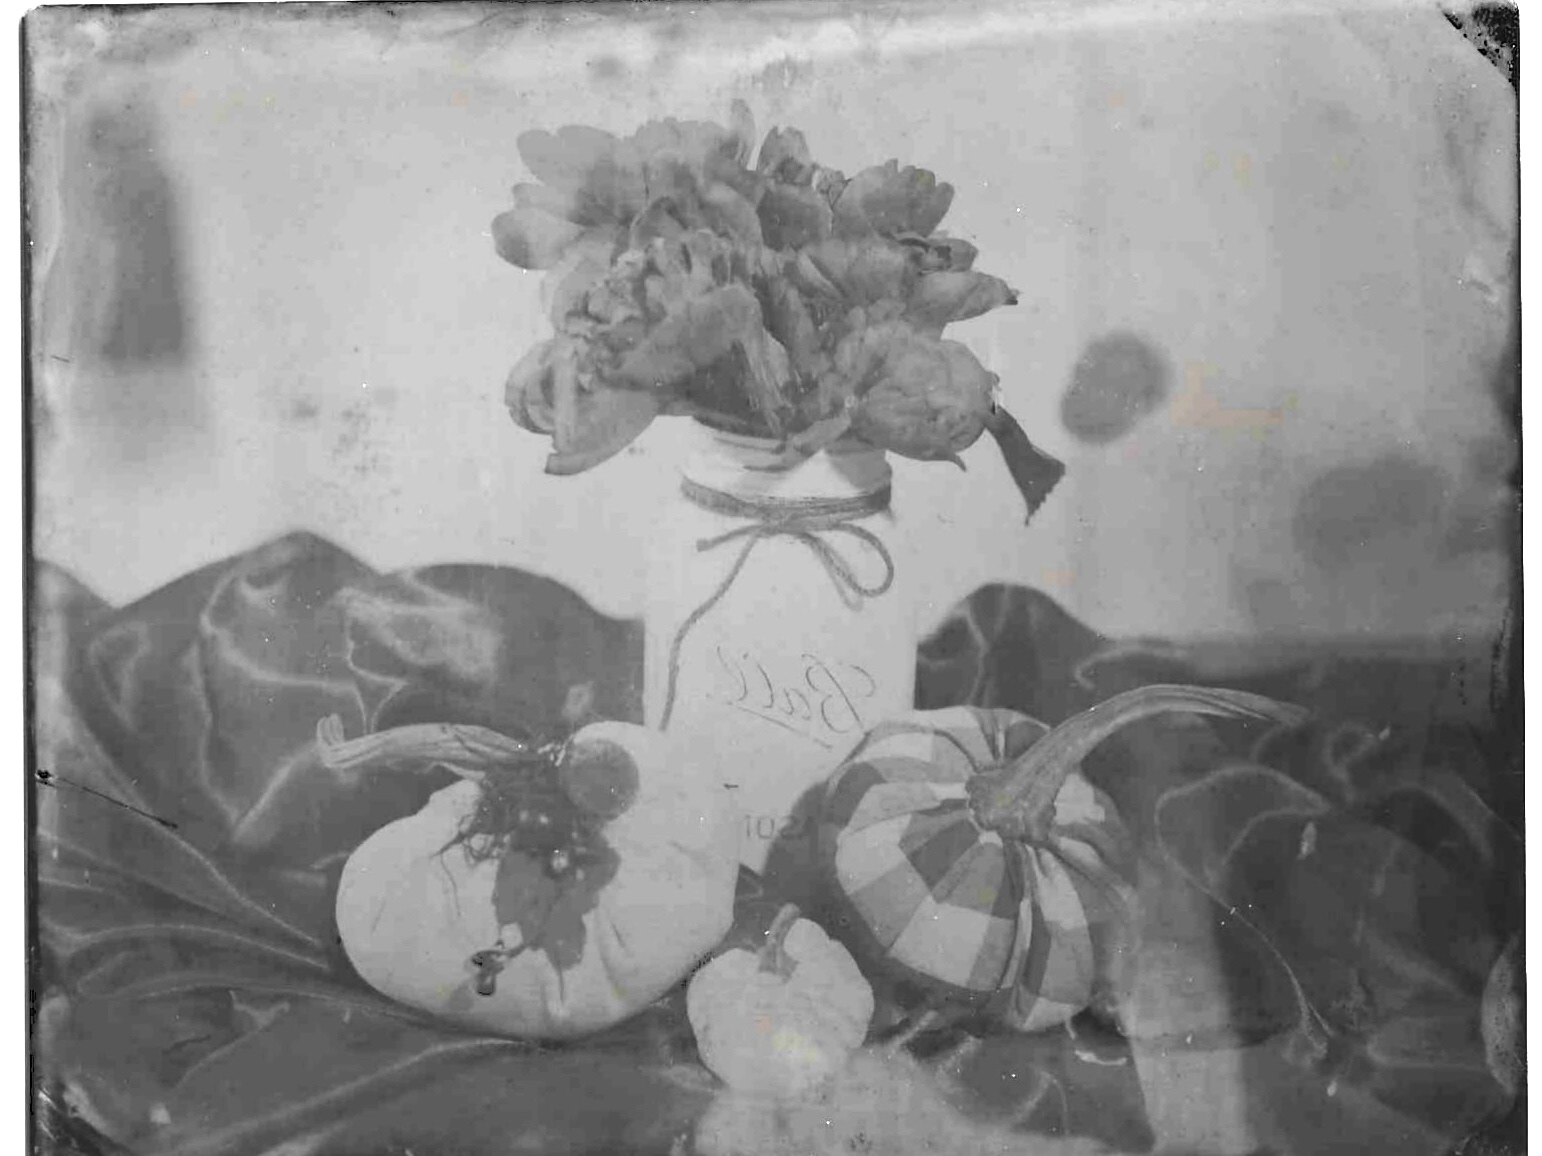
Tintype still life of multicolored pumpkins and flowers
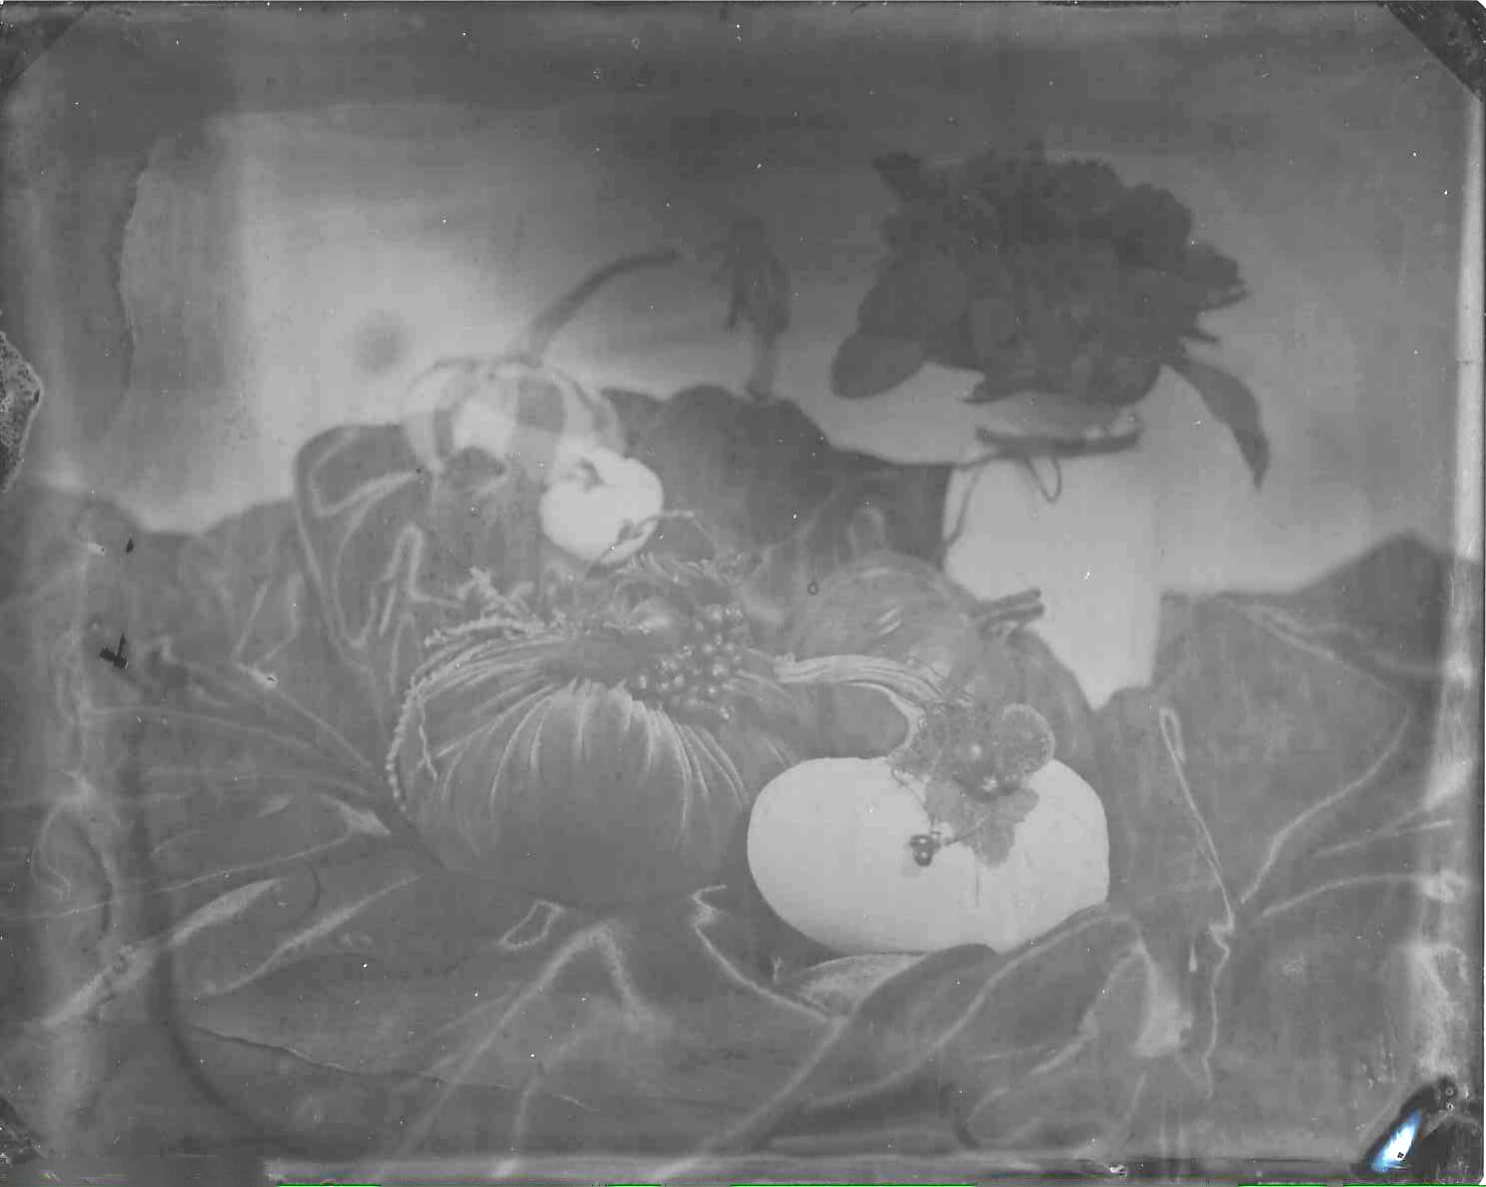
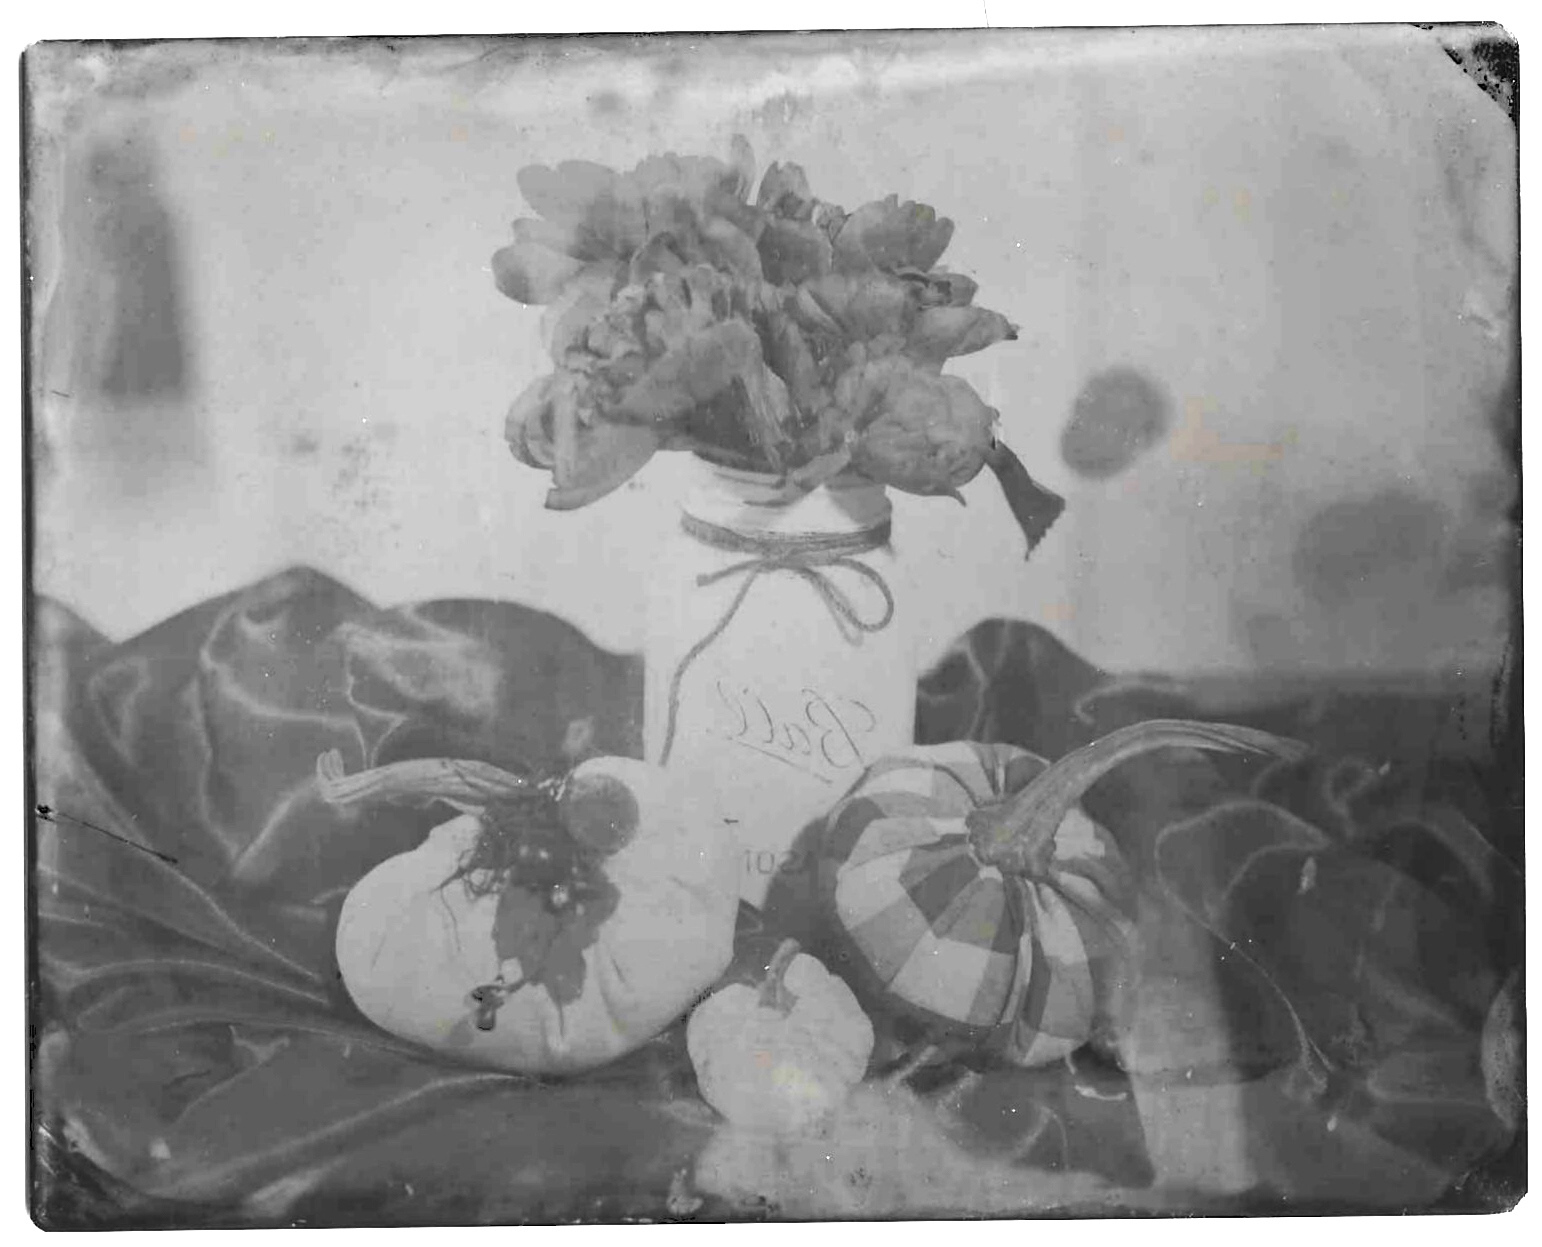

Materials: black coated metal plate, collodion, Bromo-Iodizer silver nitrate, developer, fix, distilled water. Techniques: In a darkroom, coat the metal plate with collodion by pouring it onto the surface and tilting the plate to coat each corner, discarding the excess in a labeled jar. Once collodion is tacky place the plate into a silver nitrate bath for 4 minutes to sensitize the plate to light. After 4 minutes remove the plate, clean off excess and place plate into the film holder and close tightly. Make sure the camera is set up properly and focused. Determine approximate exposure time, expose the plate then return to the darkroom before the plate dries. In a swift motion, coat the plate with developer and watch the image develop. Once the image begins to appear remove and place in a distilled water bath for several minutes. After washed, place in fixer bath for 5 or more minutes, until the image is no longer fogged. Wash again in distilled water for 15 min or longer. Dry. Once dry apply chosen protective coating – Renaissance wax was selected for this plate.
Demonstrates basic understanding of the chemical processes of wet plate photography and an understating of light and proper lighting techniques. Used wide variety of colors and textures to gain a better understanding of how they appear when using the wet plate process vs standard black and white film. Shows my eagerness to learn and fully understand an artistic process in order to better be able to conserve it in the future.
Scientific drawing of a pitcher with raised floral slip decoration
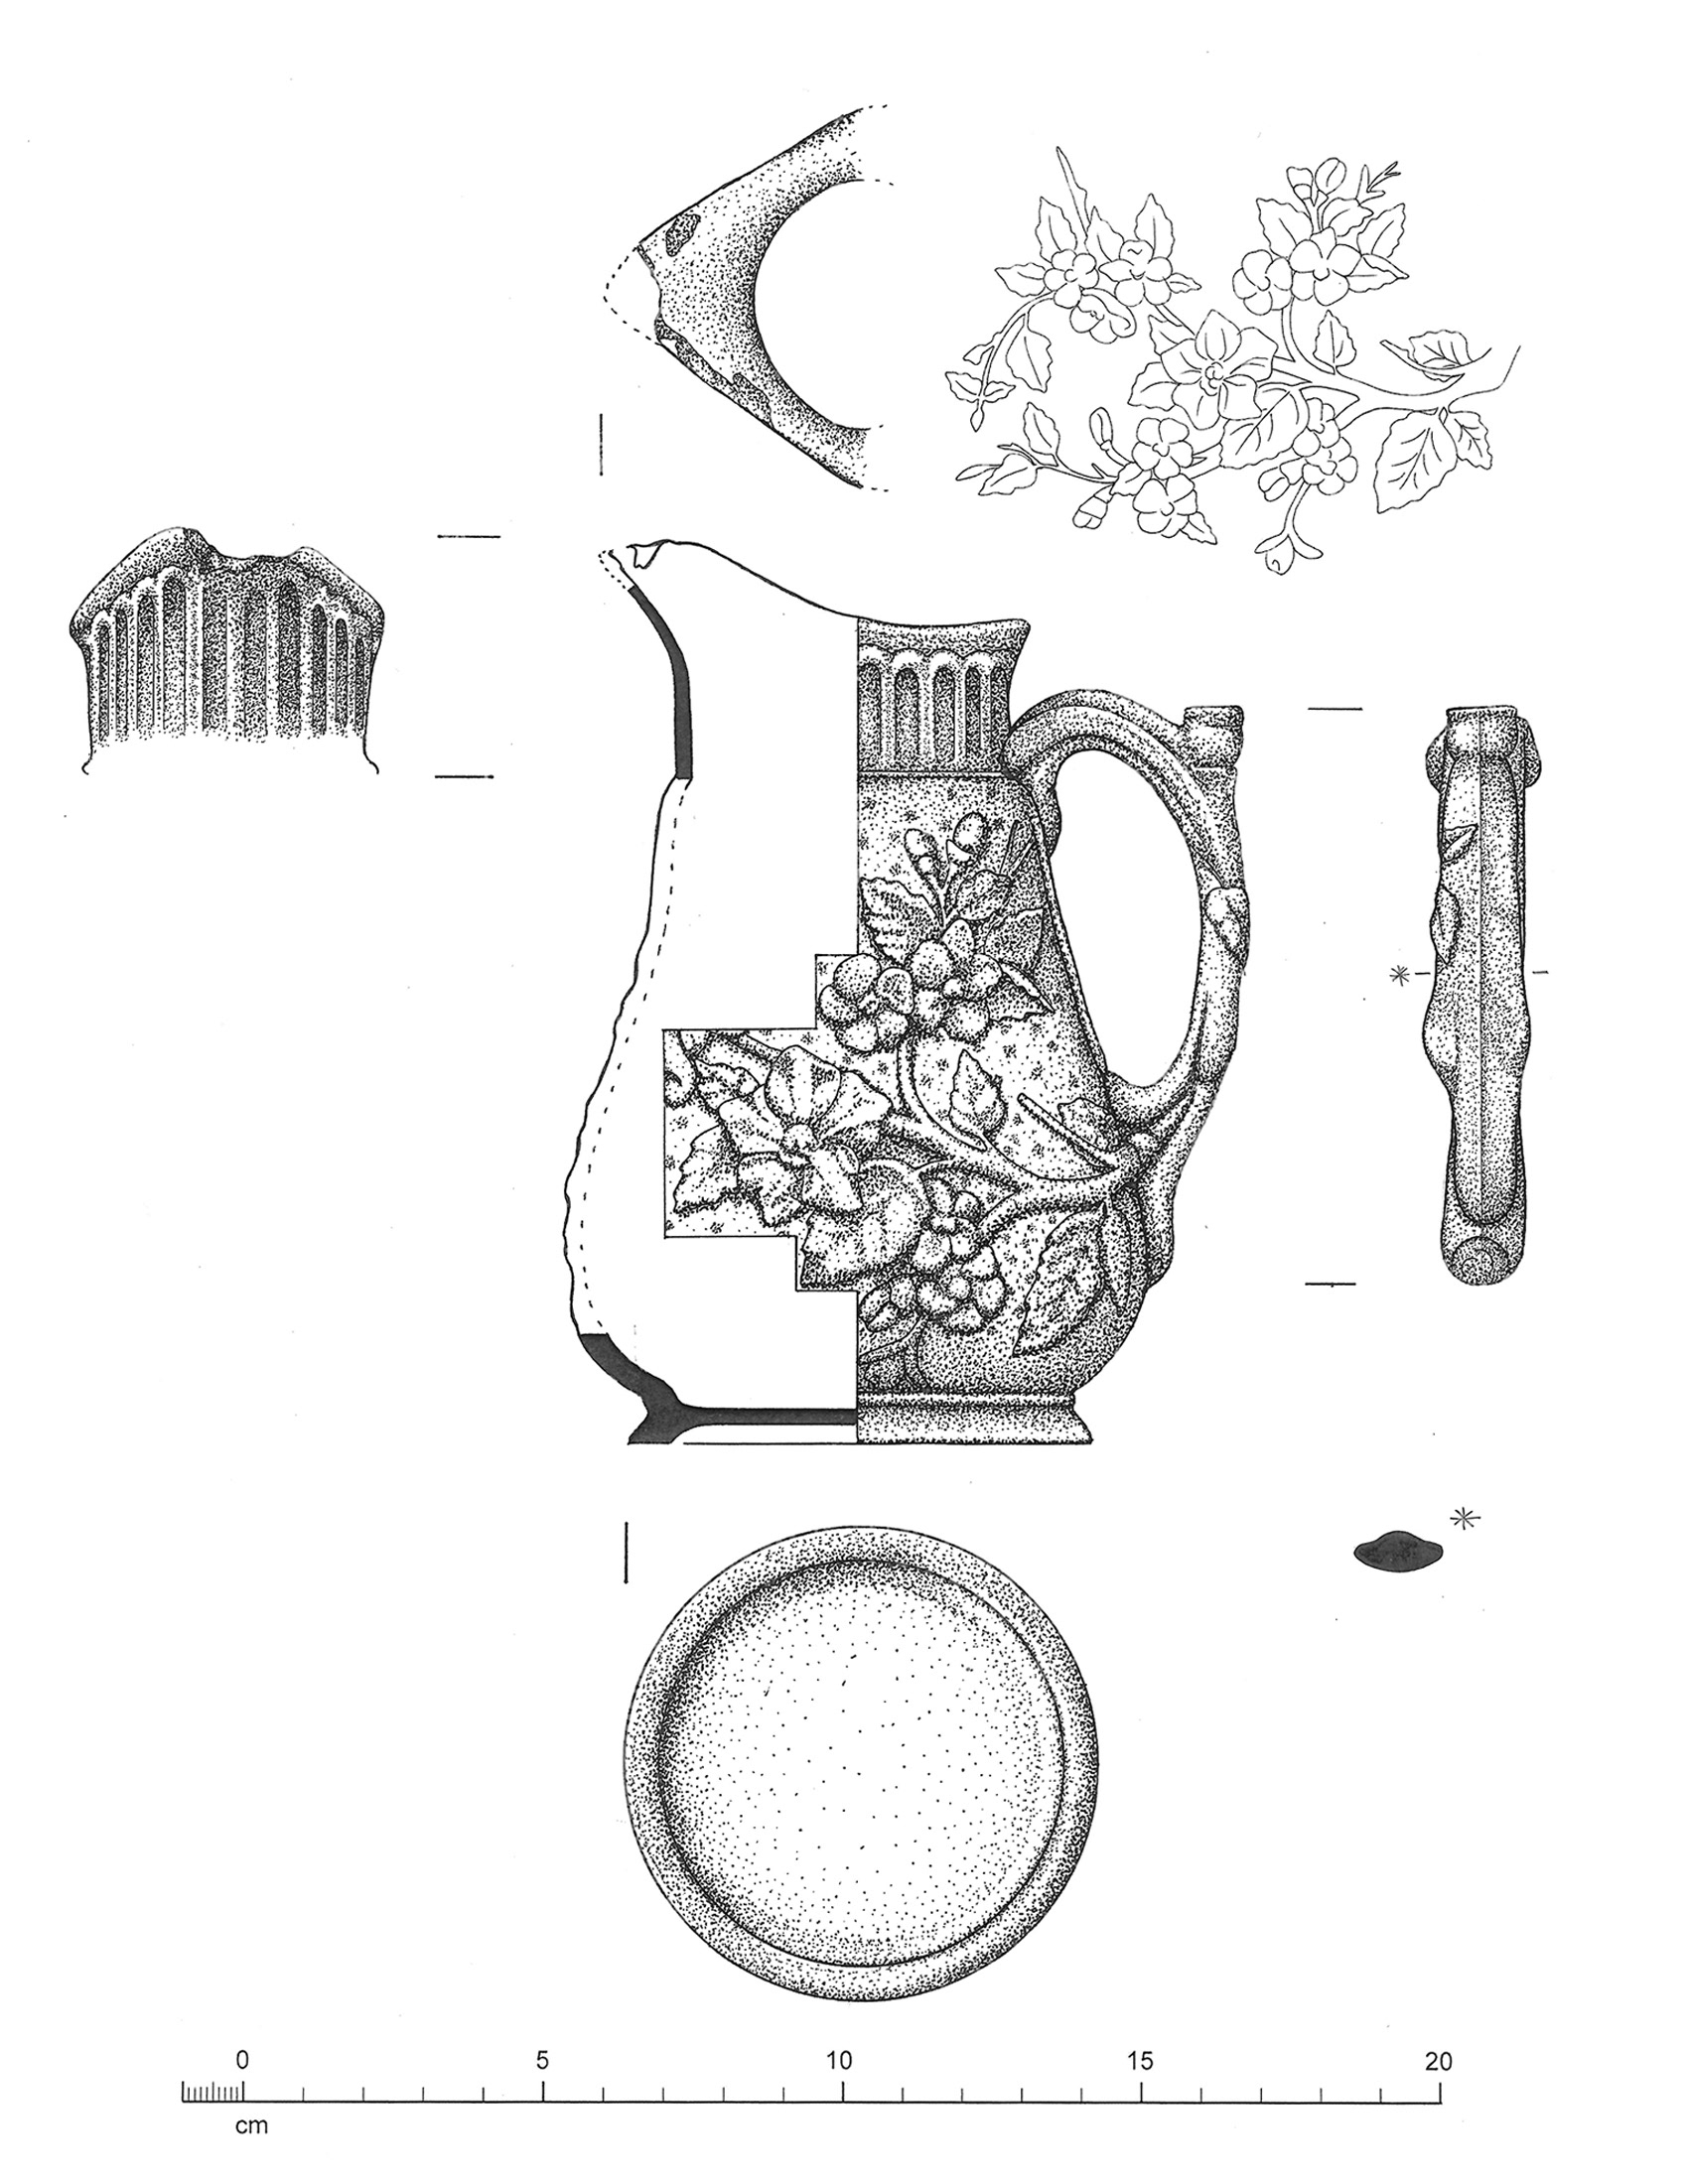
Created for one of the documentation courses I took at the University of Lincoln. Materials included a pencil, varying sizes of black drawing markers, a ruler and calipers. I chose the pitcher from a group of objects provided by the professor. In all honesty I was excited about this project and I selected one of the more difficult objects to represent.
All surface details and damage were to be shown to scale with the contours and areas of relief shown using a stippling technique. I believe this drawing exhibits my ability to analyze and correctly measure an object and a create a precise two-dimensional drawing of a three-dimensional object to scale, It also shows the ability to correctly represent dimension using a gradated stippling technique.
Scientific drawing of a railing post at Lincoln Cathedral
Materials: pencil, varying sizes of black drawing markers, ruler, calipers. Techniques: Use various drawing tools to measure every angle of the railing post and create a precise two-dimensional drawing of a three-dimensional object to scale. Contours and carved features were shown using a stippling technique. Paint remains were also noted and marked with patterned lines.
Created for CON3065M Documenting Techniques. All students were to select an object at the local cathedral, taking measurements, photographs and notes to which the drawing was created from. Return trips to the cathedral were made on our own time. All surface details and damage were to be shown to scale.
This drawing exhibits my ability to analyze and correctly measure every angle of an immovable object and recreate a representation of that object on paper showing size, shape and dimension. It also shows the ability to correctly show dimension through stippling techniques.
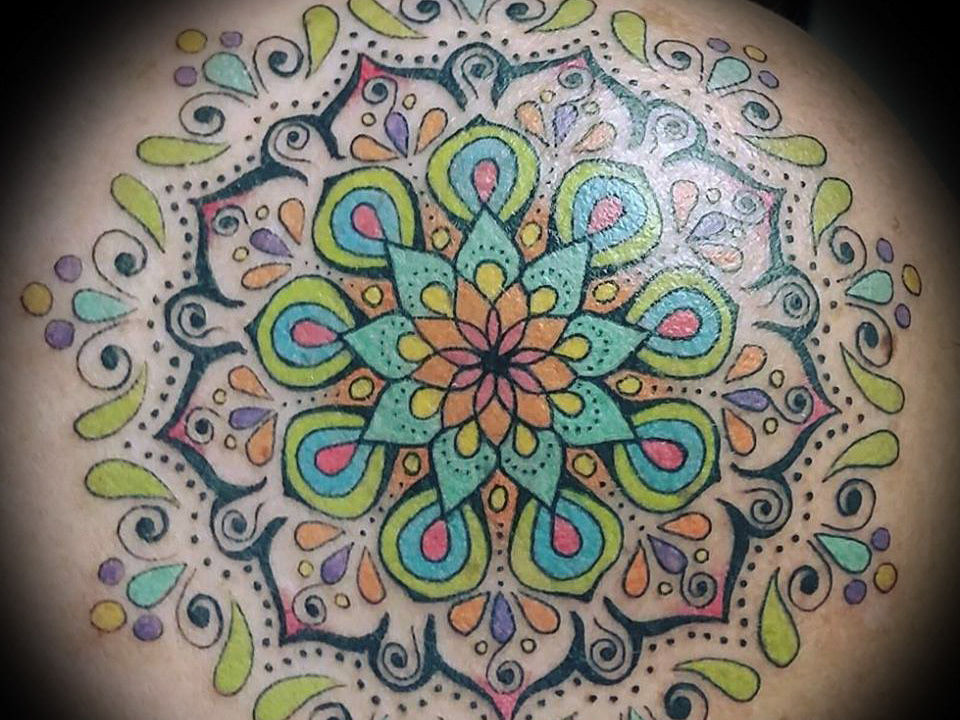
Peacock with flowers tattoo

Materials: pencil and paper, drawing of the tattoo, stencil of the drawing, ~15 colors of ink,10 mixed by the artist, black tattoo ink and 2 dilutions of the black ink for shading, 3 needle groupings, and a tattoo machine. Techniques: Drawing the tattoo using various reference images provided by the client.
The image was tattooed working from right to left (as I am right-handed) so as not to smear the stencil/drawing on the skin. Using 3 different needles (groupings) the image was first lined/traced on the skin similar to drawing on canvas, which had to be stretched while working using both hands. Areas solid color on the body and in the flowers were achieved using small, tight overlapping circles, using a sweeping method across the skin similar to brush strokes to blend the gradations of colors. The tail feathers were created using 4 colors of greens in lines to give the soft feather like effect.
This work demonstrates my ability to create finely detailed drawings and tattoos with exceptional linework, color mixing and smooth color transition techniques.
Image taken by Joy Carlsen with permission from the client
Tattooed portrait of Jerry Garcia (original portrait included)
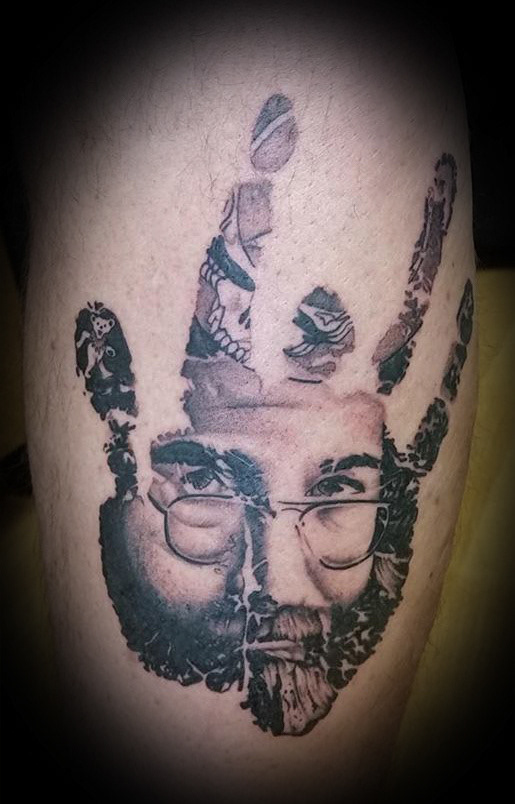
image found at: https://www.pinterest.com/pin/384283780677967239/
This was created for a music lover and a huge fan of the Grateful Dead. He wanted to include Jerry’s iconic handprint and a portrait, and after a lengthy discussion about his tribute idea, I came up with the 4 image compilation including a Jerry Bear and the Grateful Dead logo.
I digitally manipulated the 4 original images to create the final compelling piece. A drawing was made and a stencil was printed and placed on the body. This image was tattooed using a slightly different method. When you tattoo a realistic portrait you want to avoid hard lines that would flatten out the contours.
Only certain areas of the image were outlined to ensure crisp details and definition of the shapes. Next all areas in black were then colored in using the small, tight circle technique. Ink dilutions were used to shade softer areas and contours, employing a technique similar to brush strokes as before, however for this piece I used a larger grouping of needles in a faster, more circular motion. Reflections in the glasses, beard and eyes were highlighted using white ink and a lining needle. Great care was taken to ensure the final image was a true representation of the photograph and the handprint was as close to the original shape as possible.
Image taken by Joy Carlsen with permission from the client Portrait courtesy of www.pinterst.com
Handmade jewelry
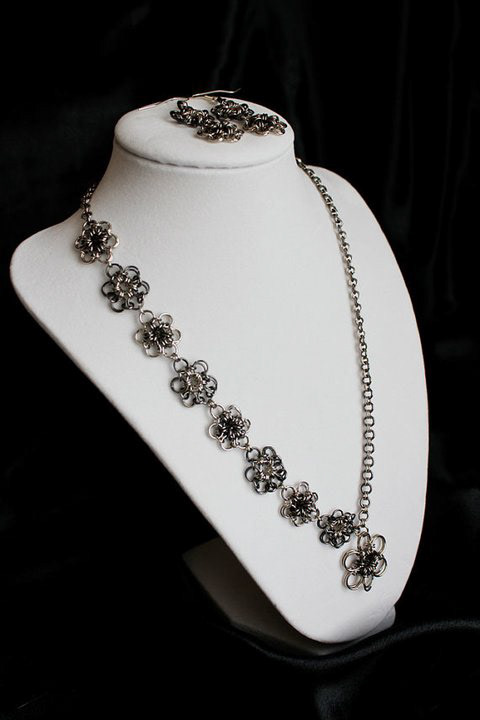
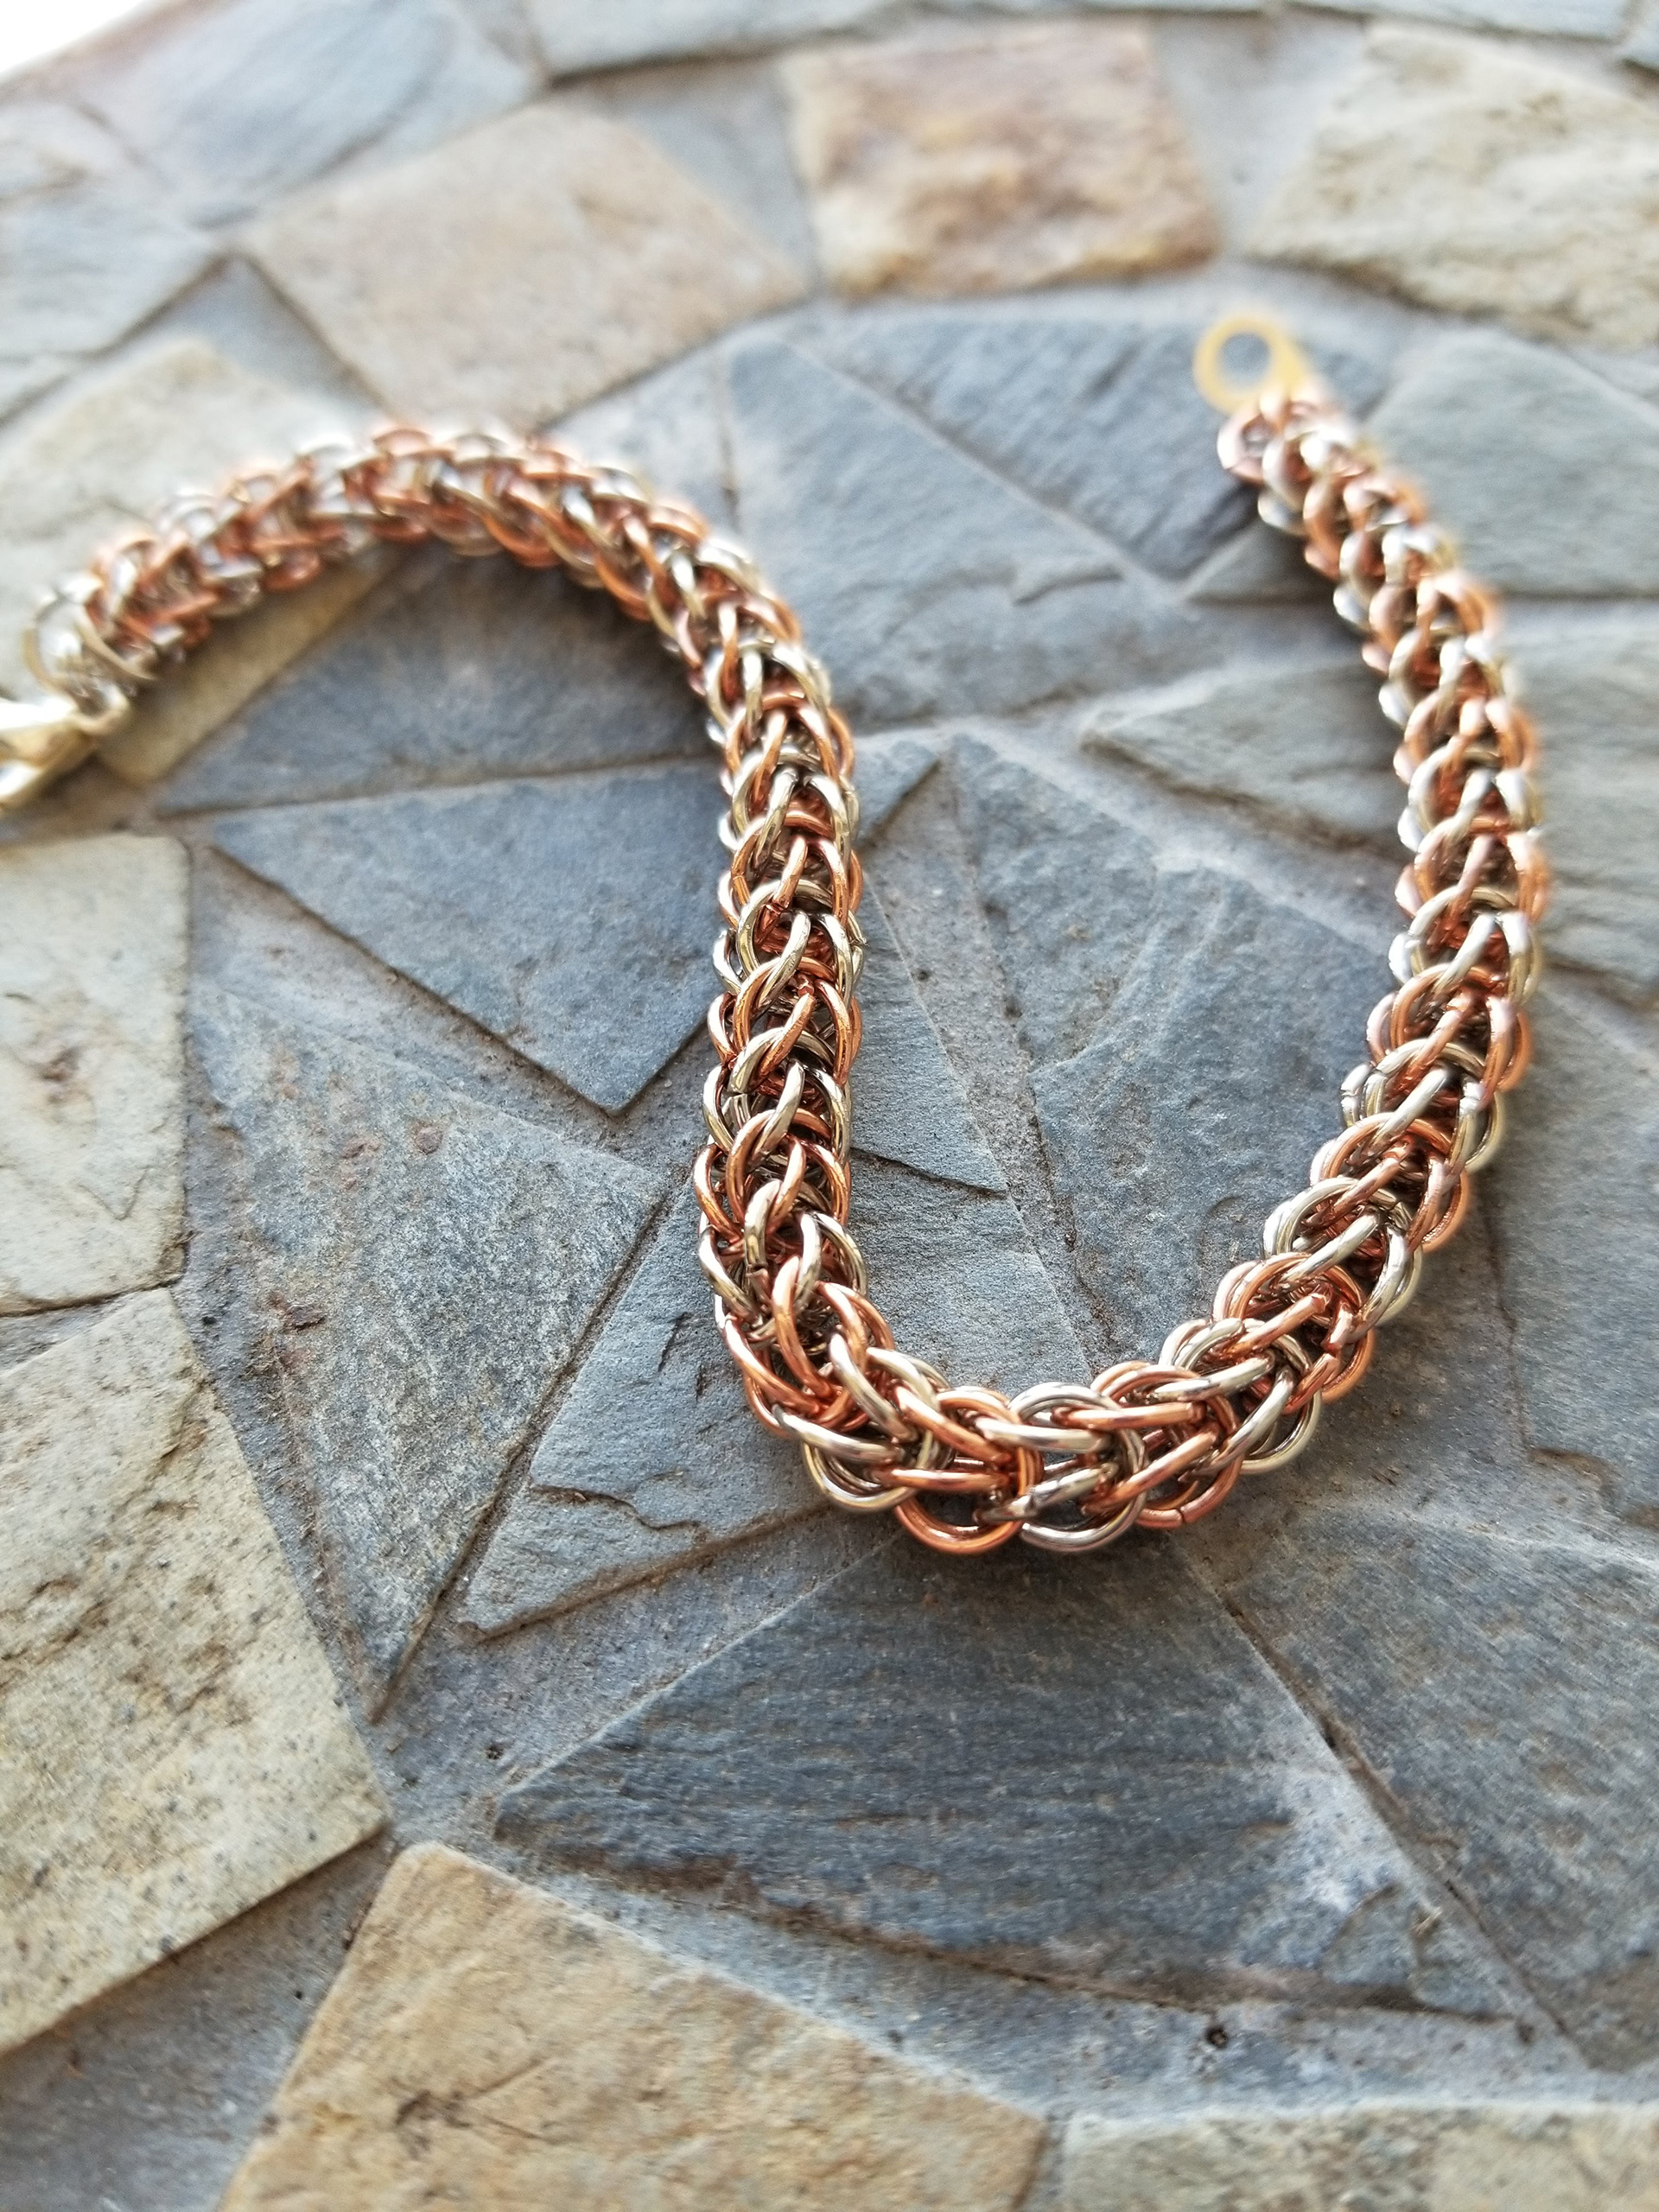
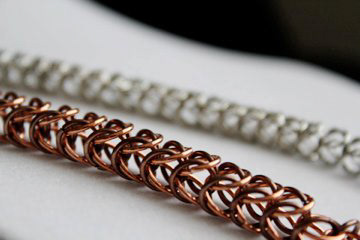
Materials: Copper, brass and stainless steel jump rings and wire, polished stones. Techniques: Manipulating jump rings with pliers in both hands - each ring around its surrounding rings while following a repeated chainmail pattern, and bending and manipulating wire.
Demonstrates ability to use tools in both hands to manipulate small, delicate objects and reproduce an object and pattern based on an image, no instruction.
“Tattooed” ceramic arms on custom wall mounts
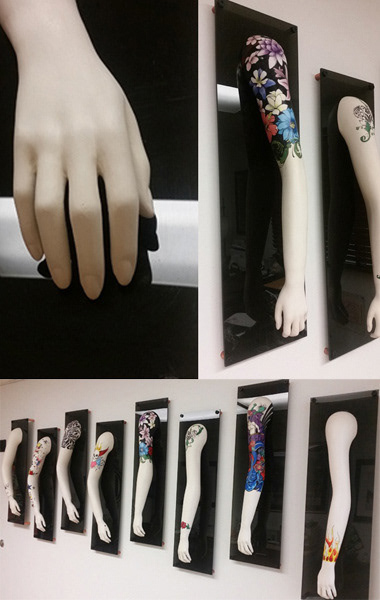
Materials: plaster, porcelain casting clay, various ceramic tools, mannequin arms, pencil, fine art markers, acrylic paints, paint brushes, pre-cut plexiglass panels, epoxy, large deck screws, copper pipe cut in 4 lengths. Porcelain cast arms with acrylic paint and fine art marker, plexiglass backing with copper pipe offsets to set off the wall. Techniques: Mold making, casting, shape refinement, drawing and painting.
BFA thesis project – The thesis behind the project dealt with the idea of permanence and the difficulties of skin as a medium; people are a difficult medium to work with. If we had removable limbs, clients could leave their arm with me, the artist. I could work without having to manage their pain and my own discomfort when trying to work on an area of the body that is difficult to reach and manipulate. Removable limbs would allow you to change your tattoos like your clothing, without going through the pain of removal or coverups.
This project demonstrates my ability to create large, clean casts using a fine porcelain material. Employed fine motor skills using ceramic tools to remove the thin clay film between the fingers and along the cast connection taking care not to damage the surface or break off fingers. My ability to draw clean lines and demonstrate my drawing and painting abilities on a rounded, hard, unforgiving surface.
Knitted fingerless gloves
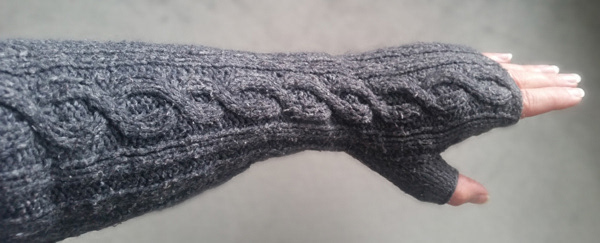
Materials: cotton wool blend yarn. Techniques: Knitting in the round in a rib pattern with a single chain crossed cable across the top of the glove, reducing stiches until you reach the wrist. The separate thumb section was knit off to the side with another set of 5 needles. Process involved casting on, knit stitches, purl stitches, crossover stitches, reducing, and increasing stiches and final cast off.
The gloves exhibit my attention to detail, manual dexterity and hand-eye coordination using two needles and increasing to 7 needles. It showcases my ability to follow directions and maintain a pattern, and understanding of how to properly measure for correct length, width and stitch tightness throughout to ensure a proper fit.
Rose watercolor painting
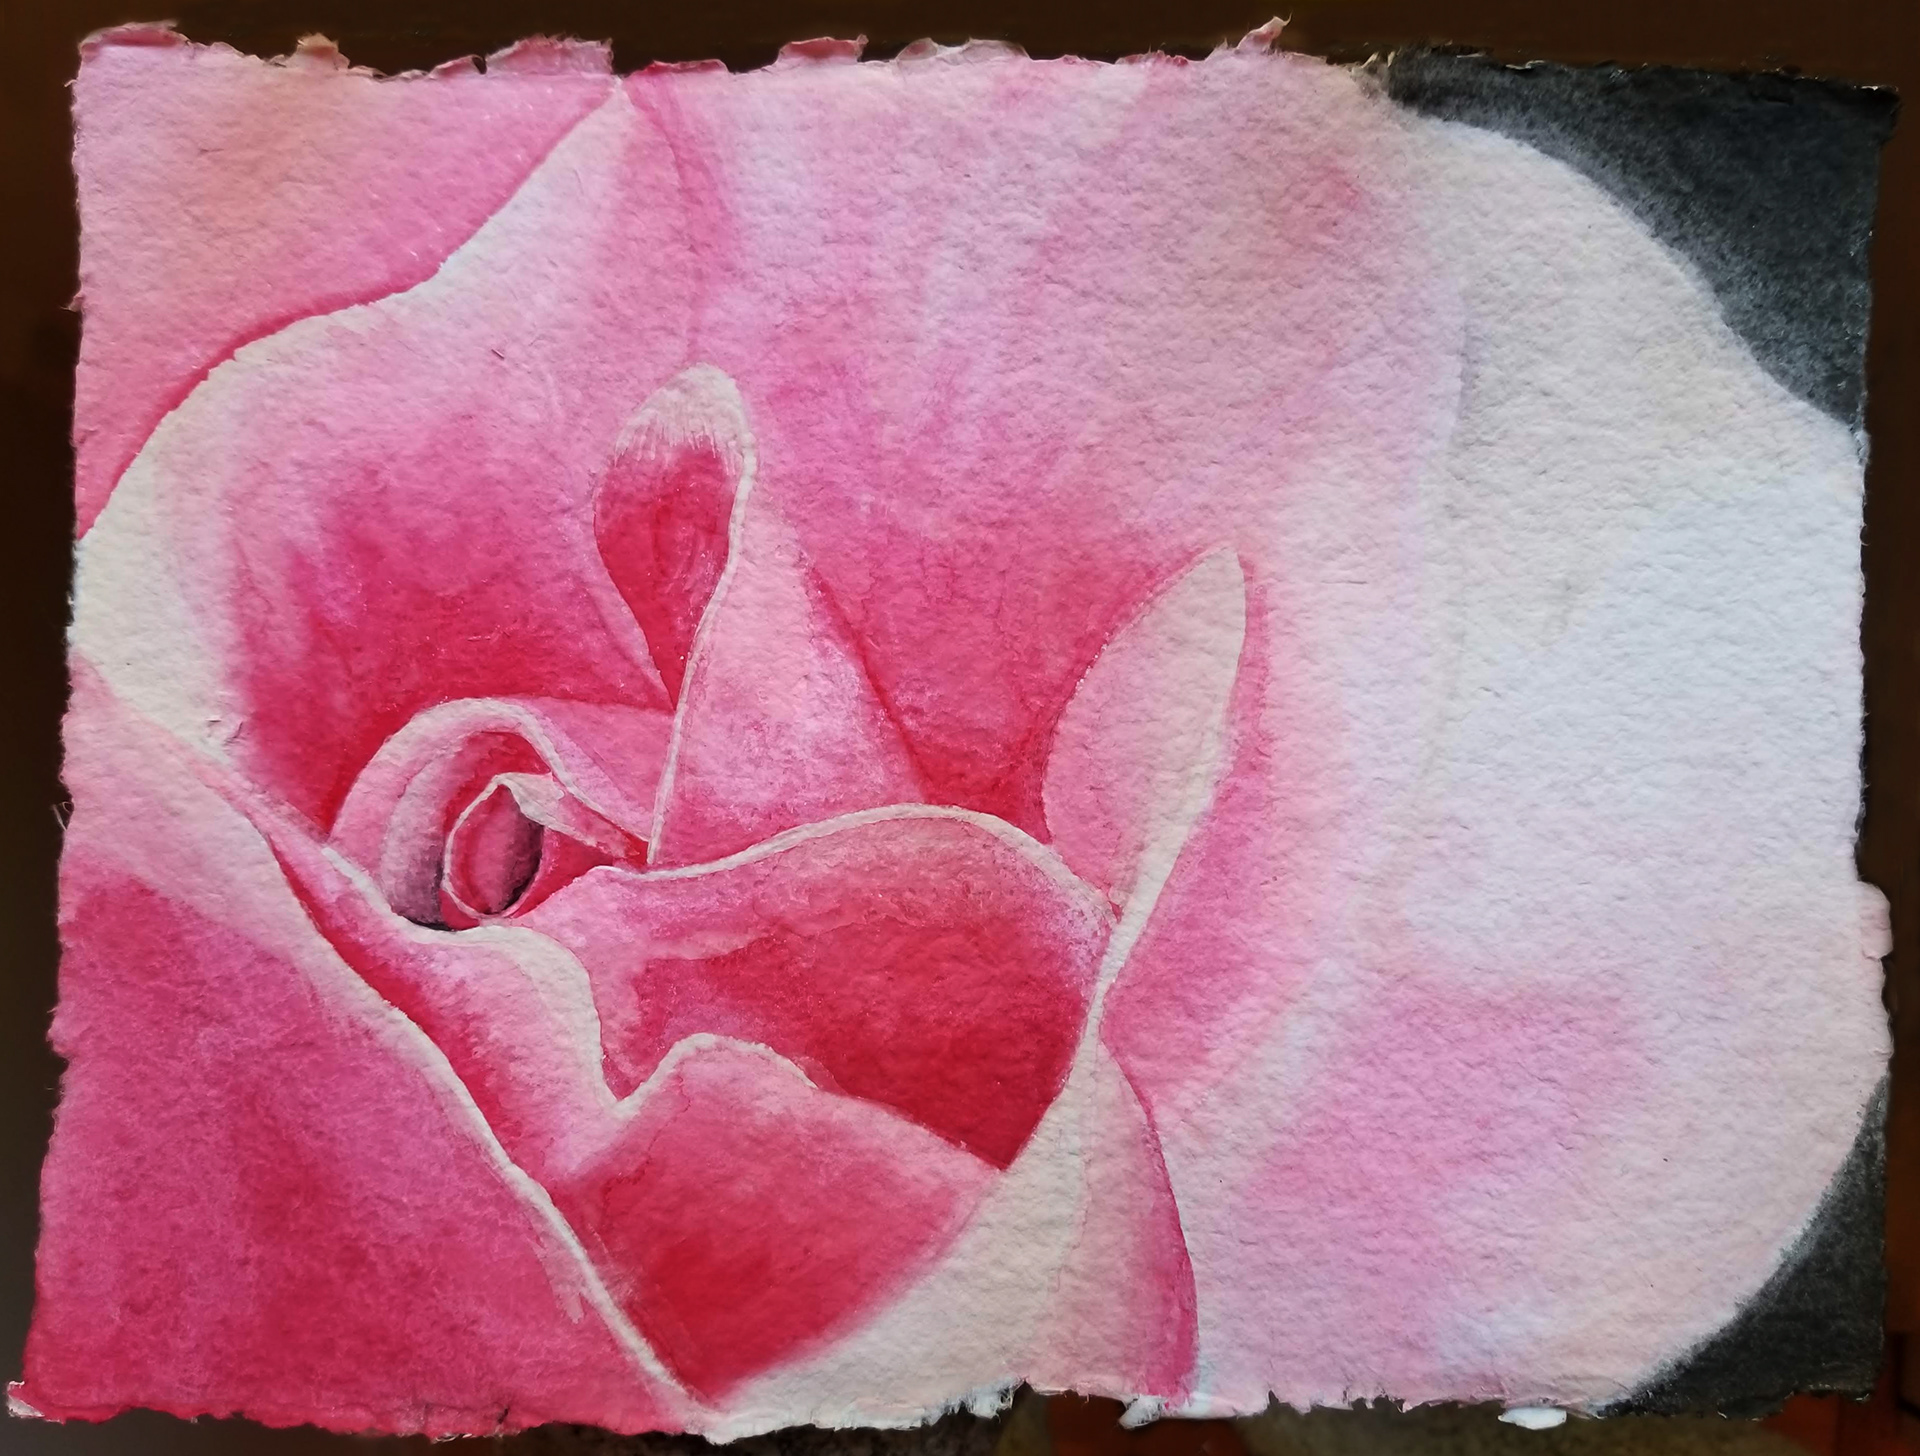
Materials: pencil, thick rag watercolor paper, image of a rose, various brushes, a watercolor paint palette. Techniques: Pencil drawing from a photograph, paint using red, pink, black and white paint; beginning with the darkest color, mixing gradations from dark to light as I progressed through the painting.
This shows my ability to mix and blend colors in a smooth gradation, paint using large brushes in a sweeping motion and with small brushes for more precise details.
Linocut prints of the inside of a tulip (personal photograph included)

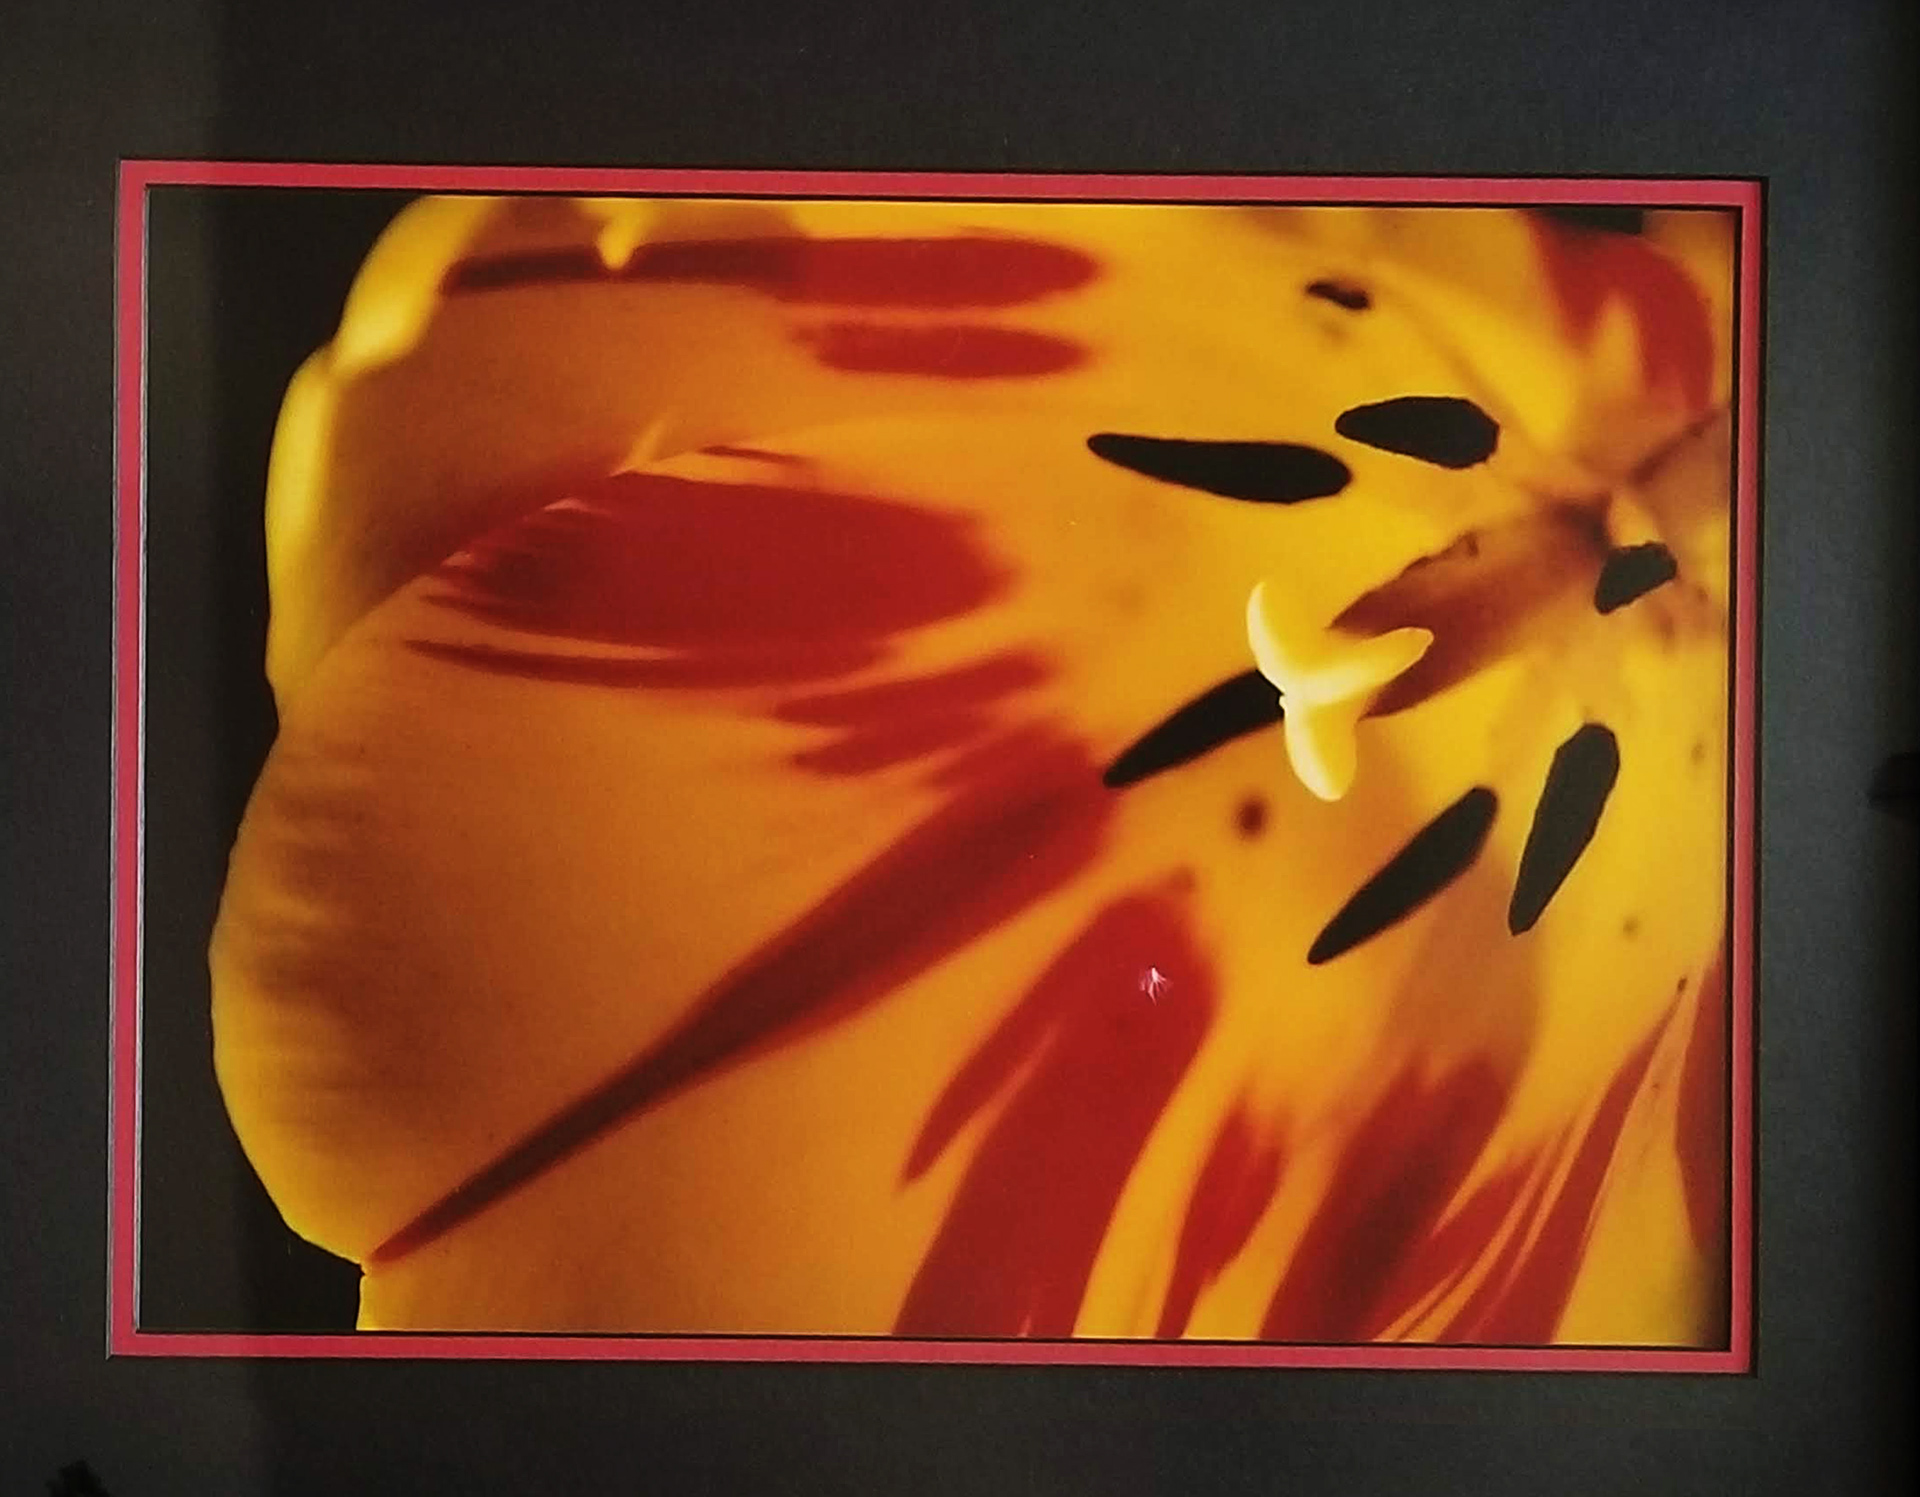
Materials: photograph, pencil, paper, transfer paper, block printing ink, linoleum, carving tools, 2 transparencies. Techniques: Drawing the image, creating handmade transfer paper to put the drawing on linoleum, carving the areas of recess from the linoleum and using the printing block and various colors of ink to create the image.
Demonstrates carving competence, a steady hand and printmaking abilities